Tuesday, June 25, 2013

DIY Old Window Photo


So it has been a while since I've posted, but my creative gears have been turning. My husband and I celebrated no longer being newlyweds. This past year has gone by so fast but has been one of the best years!😊

There's an antique store a few minutes down the road from my house that has a TON of old windows piled outside. I have been observing them in passing, but I was unsure if I was crafty enough to transform it! One window was $10 or 3 for $25. I'm just not sure what to do if I bought 3 windows though.
Here's the chosen window with another one of my thrift store finds...

The total time to make & hang was only about 30 minutes!!! The most time consuming was hanging it straight!! Haha.  

Here are some of the items I used...
                    
        
A measuring tape
Plain clear tape
A stud finder
Hammer & nails
Picture "tooth" hanger. ( idk the official name.) 

I just cleaned the window with a little glass cleaner. I thought about re-painting it but I like the rustic look I has. I also made sure to choose one of the better looking windows at the store. 

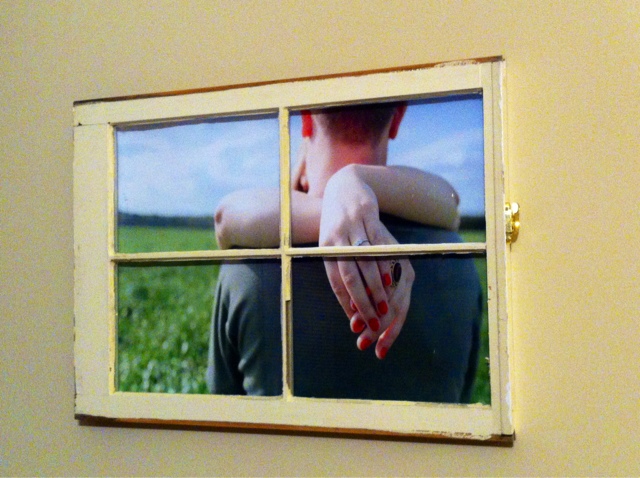
I blew up one of our engagement pictures at the FedEx Office store for about $30. The size is 22 x 28 and it fit perfectly in the window. I thought about cutting it up and individually hanging each picture in each window, instead I just taped the entire photo on the back of the window. 


I also added the picture "teeth" on both sides of the window. I made sure to measure the teeth were far enough apart so that both nails would hit a stud in the wall. I know this window is heavy so I wanted it to be secure. 

Next, just hang it straight!! 


It's that easy!!
It is a nice big accent piece, something I've been looking for!

Please comment any questions. This definitely turned out to be much easier than originally thought! 

Tomi 

Wednesday, June 12, 2013

Starting Off With a Red, White & Blue B-A-N-G!

What better way to start off my first DIY blog post that with a patriotic BaNG! For the past week, I've been using fabric prints to create my own red, white and blue spirit for our front door. Since sewing is not my given talent, I never get to pick out fabrics at the craft store, and it's a shame bc there are so many cute prints! I created two DIY fabric rag wreaths this past week, a big & a mini, bc they're so easy and inexpensive to make. 

Here's how to make yours........


Shopping cart list: 


1 multi-layered wire wreath

4-5 fabric prints of your choice; 1/4 yard each

Scissors or fabric cutter

Ruler
      

*** I made one large wreath and one mini. The larger wreath will use all of the fabric. If you choose the mini wreath, you will probably have enough fabric for two minis. 

Now believe it or not, the large wreath (pictured above on left) only cost me about $13. I chose 5 different fabrics that were on sale at Hobby Lobby for 30% off, and had a coupon for the wired wreath for 40% off (which was originally only $2.99.) The burlap flower was extra but still only $2.99. 

So let's starting cutting fabric! Cut 5-6 inch strips that are 1-inch wide. This part is probably the most time consuming. 


   Aaaaaaaand....when all cut you're ready to assemble. 


Let's put it together!


Begin by taking one strip and fold it "hotdog" style, as they would say in school. 😊


Then loop around your finger like this..... 

Wrap the loop under the outer ring of the wreath....


Loop the two bunny ear inside the loop and pull tightly!!


Now some tutorials I have seen on rag wreaths just knot the fabric around the entire wire wreath; however, I cannot stand that tacky white side of fabrics and doing it this way will avoid it showing! 
Continue looping and pulling strips in your order preference. I decided to do one section at a time. 


It'll take some time but your final product will be worth it! 
 

Once you've made it to this point, either hang it up or add a little extra to it! On my large wreath, I added a simple burlap, my favorite, flower to it. One the mini wreath, I'm surprising my mom with, I really took it to the next level, and hand stitched USA on leftover fabric strips and added it to the center. 


TA-Da!! Please write me if you have aaannnyy questions. It's such an easy way to add a little Fourth to your door!!


  Tomi

Tuesday, June 11, 2013

Let The Crafting Continue....

Welcome! It's my very first blog and it's open for business. 😊 Crafting is not new to me and I started very early in life. It's always a way to escape without boundaries. Beading & jewelry took over a few years of my life but recently I'm interested in wreath-making. As long as it doesn't involve cooking or sewing, I'm your girl! Maybe you can help me learn along the way.


I created this blog to get some of my ideas out there and taking in new ones along the way. My nana is in my earliest crafting memories. She had this wild assortment of beads, big and small. There were no boundaries with her and I would sit there and just rummage through the different types of beads, running my fingers through them. She's been gone for a long time, but I will always remember that and sometimes crave her beads collection she once owned. She is the "Hummingbird," that makes up half my title.

Now how Southern is "Dahlin?" I know some of you just said it out loud. ☺ It just rolls off the tongue so well. It never failed that whenever I called my grandma, her response was always, "hey Dahlin'!" Or you walk in the house for Sunday lunch after church and she'd be at the stove, one hand on her hip and the other stirring. She has also been gone for a long time but she brings out the southern, "Dahlin'" in me.


In closing, I am very exciting about the start of this blog. I hope you'll take away something in my life and include me in yours. Stay tuned for an up-incoming Red, White & Blue craft! 


Tomi 🎀